
24 January 2015
In a way, this hike is our trip to Mars...
Pearls Before Swine Comic Strip, May 06, 2012 on GoComics.com
The following comic strip has been on our refrigerator for a long time. Maybe too long before we did something.
Pearls Before Swine Comic Strip, May 06, 2012 on GoComics.com

Finally done... almost.
H:
The backpacking quilt saga continues but only for a little longer.
If you remember a few posts ago I talked about how I stalled on sewing the top half of the quilt together due to a "repinning" situation. I bucked up the other day and, as best I could in our RV, I laid out the top half, unpinned then repinned the whole thing in order to get the "draft stopper" into its correct place. A drafter stopper is a little bit of extra material that hangs off the perimeter of the quilt and will keep any cold air from seeping in a spot where the quilt itself isn't touching the ground. Not exactly a necessary piece but was well worth taking the time to repin.
So enthused was I by my progress I set up the sewing machine and wrestled the behemoth into the machine, sewing together the layers except for 15 inches at the bottom. I turned the quilt right side out and closed the gap at the bottom. That last bit took way too long due to the slick material and me being too fussy about trying to make it look "nice." I finally gave up and just made it work. It's ugly but it's warm.
I was inspired or maybe desperate. I grabbed the second half of the quilt. While the four foot wide spot of floor space was clear and Dave was at work I pinned the second half together and went back to the sewing machine.
.jpg)
The backpacking quilt saga continues but only for a little longer.
If you remember a few posts ago I talked about how I stalled on sewing the top half of the quilt together due to a "repinning" situation. I bucked up the other day and, as best I could in our RV, I laid out the top half, unpinned then repinned the whole thing in order to get the "draft stopper" into its correct place. A drafter stopper is a little bit of extra material that hangs off the perimeter of the quilt and will keep any cold air from seeping in a spot where the quilt itself isn't touching the ground. Not exactly a necessary piece but was well worth taking the time to repin.
So enthused was I by my progress I set up the sewing machine and wrestled the behemoth into the machine, sewing together the layers except for 15 inches at the bottom. I turned the quilt right side out and closed the gap at the bottom. That last bit took way too long due to the slick material and me being too fussy about trying to make it look "nice." I finally gave up and just made it work. It's ugly but it's warm.
I was inspired or maybe desperate. I grabbed the second half of the quilt. While the four foot wide spot of floor space was clear and Dave was at work I pinned the second half together and went back to the sewing machine.
.jpg) |
| Surrounding the quilt are growing piles of empty boxes (really need to break them down and store them out of our living space). These boxes will be used to ship our supplies. There's also a stack of camping gear in the upper corner, and yeah, it's sitting next to some bins of yarn. |
.jpg) |
| This photo shows the small amount of shaping done on the lower half. |
.jpg) |
| Here's the lower half, right side, out with draft stoppers in place. The top as you're looking at has the zipper that will attached to the top section. The bottom bit without the draft stopper is will be folded under and sewn together to form a foot pocket. This will happen after the quilting is done. |
.jpg) |
| This is the top half, with the infamous drafter stopper in place. The left side is the head, the right is the zipper section that joins to the lower part. |
All that remains on the quilt is to sew the layers of this mountain of fluff together with quilting yarn. I think this will wait until I go back to my cousin's for a visit because I'm moving on to sewing our backpacks!
More canned pineapple experiments are happening in one food dehydrator today and bunches of beans are in the other. My next experiment will be tomato/corn meal crackers that I read about in a book.
23 January 2015
Air tight...
H:
I was considering purchasing a vacuum sealer to seal up some items that last longer better when vacuum sealed... well how great is it to have awesome friends? Our friend, Kathryn, loaned us her sealer and tossed in a box of bag material! I can't wait to get started with it.
.jpg)
.jpg)
.jpg)
.jpg)
.jpg)
I was considering purchasing a vacuum sealer to seal up some items that last longer better when vacuum sealed... well how great is it to have awesome friends? Our friend, Kathryn, loaned us her sealer and tossed in a box of bag material! I can't wait to get started with it.
Dehydrator 1 is filled with canned pineapple. I bought some to eat and harvest off the juice for dipping apples. I decided to try them again in the dehydrator. This time I had chunks of pineapple that I sliced into 1/8th inch slices. Dave suggested smashing it up with a rolling pin or putting it through the blender. The pineapple is pretty soft so just I grabbed a fork and smashed each piece flat. I did two cans of each type of process.
.jpg) |
| Nibs of pineapple. |
 |
| Flattened pineapple chips. |
This morning it is just under 24 hours and the smashed pineapple turned out lovely and crispy and stayed a bit spread out. The sliced chunks shriveled up quite a bit in all directions and are still have a bit of water in them. I think the nibs are great for say... pineapple rice on the trail while the smashed flat will be great for trail mix snacks.
Dehydrator 2 is packed with frozen vegetables, peas, green beans, broccoli.
Yesterday I purchased more beans for drying in the dehydrators. As I'm packing the beans away I find that I'm nibbling on the dried beans. This morning I looked up recipes for roasted beans. Currently in my oven are garbanzo beans with a little olive oil. These will soon be tossed with cumin, garlic, and a bit of salt. I have a recipe for kidney beans that are tossed with a bit of brown sugar and spices. Yum!.
.jpg) |
| Click HERE for the recipe. |
I think I roasted them just a bit too long. The recipe said 400 degrees F but the person said they roasted at 325 because they were using a convection oven. I started at 400 but the beans seemed to be roasted too fast as they were still mushy but getting very brown. I turned it down and they are quite brown but now crispy and dry. They still taste good, just a little too done.
Hm... time for another batch!
22 January 2015
Broken then fixed, broken and fixed again!
D:
A couple of days ago, my refurb mp3 player I intend on taking on the trail would not turn on under it's own power anymore. It would turn on when I plugged it into a computer and I could look at the files with a laptop, but after I would disconnect it from the usb port, it would turn off again.
One of billions of videos on youtube revealed a way to open this model of player so I could take a look at it, to see if it was an apparent break, it was. This picture shows the 3 wires coming from the battery where they are supposed to connect to the circuit board.
I was able to clean up the end of all the wires, and properly solder them at each point on the circuit board. When I snapped it back together, everything worked and I've used it at the "Y" for the last 2 days.

A couple of days ago, my refurb mp3 player I intend on taking on the trail would not turn on under it's own power anymore. It would turn on when I plugged it into a computer and I could look at the files with a laptop, but after I would disconnect it from the usb port, it would turn off again.
One of billions of videos on youtube revealed a way to open this model of player so I could take a look at it, to see if it was an apparent break, it was. This picture shows the 3 wires coming from the battery where they are supposed to connect to the circuit board.
I was able to clean up the end of all the wires, and properly solder them at each point on the circuit board. When I snapped it back together, everything worked and I've used it at the "Y" for the last 2 days.
20 January 2015
Sleeping Beauty... or not...
H:
One of our sewing projects to be done is a sleeping bag of sorts. It's made out of sleeping bag material but will be closer to a quilt when done. One theory is that heat rises and while insulation on top is necessary but the bag underneath you is squished flat when you lay on it and thus you loose the insulation properties. To save weight while hiking you can simply eliminate the material under the sleepers. There are commercial versions available for $380! Our kit was about $145.
Let the sewing begin... after cutting out all the pieces.
The insulation will be 2 layers thick because I sleep COLD! Another benefit to the 2-person quilt is that the heat of the 2 sleepers is shared within the quilt.
.jpg)
.jpg)
.jpg)
.jpg)
.jpg)
.jpg)
.jpg)
.jpg)
.jpg)
One of our sewing projects to be done is a sleeping bag of sorts. It's made out of sleeping bag material but will be closer to a quilt when done. One theory is that heat rises and while insulation on top is necessary but the bag underneath you is squished flat when you lay on it and thus you loose the insulation properties. To save weight while hiking you can simply eliminate the material under the sleepers. There are commercial versions available for $380! Our kit was about $145.
Let the sewing begin... after cutting out all the pieces.
The insulation will be 2 layers thick because I sleep COLD! Another benefit to the 2-person quilt is that the heat of the 2 sleepers is shared within the quilt.
The quilt has some shaping and piecing that needs done. Due to the construction, instead of a standard vertical zipper for opening the bag, this one has a horizontal zipper that will separate the quilt into "halves" to make it easier to carry.
After about 6 hours of work on the quilt I hit a wall. Dave was helping me pin the layers together so that I could sew the quilt layers into one. We were moving along just fine... then I found that there was an extra piece. Why didn't this get put in before the bag was pinned together. I read back over the instructions call for you to pin it all together but then a few pages later it has you remove the pins, put in this extra piece, then pin it all back together! WHAT?!
I had skimmed over the 12 pages of instructions before, but some how missed this series of steps. The designer has you use clothes pins which might have been easier to follow exactly the instructions, but I can't figure out why you would pin it together and then unpin then repin. I don't have a clothes pin to my name... but I am a quilter and I have lovely quilting straight pins. I put a few hundred in the bag to keep the very slippery material from shifting. Either way I was done for the day.
I'm trying to build my will power back up to take 3/4 of the pins back out, stick in the extra piece of material and then pin it all back together to get sewing again. Maybe today... then again it is a very sunny lovely day outside and maybe I should just go sit outside with a beer.
15 January 2015
An apple a day...
H:
One of today's projects was getting the food dehydrators running. We have been away from home for a few days and were not able to keep them going while we were gone. Our cat isn't quite skilled enough to get the food out of the trays and into bags so we left them empty.
.jpg)
.jpg)
.jpg)

.jpg)
.jpg)
.jpg)
.jpg)
One of today's projects was getting the food dehydrators running. We have been away from home for a few days and were not able to keep them going while we were gone. Our cat isn't quite skilled enough to get the food out of the trays and into bags so we left them empty.
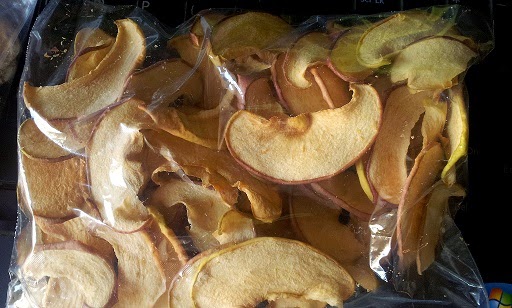
This morning we grabbed a bag of apples from the local orchard and I sliced while Dave spread out the slices on the trays. We have a system and it doesn't take us very long to fill the 2 dehydrators. In 24 hours we'll have lovely, crispy apple chips that taste amazingly like... well... apples. If we hike for 6 months and would like an apple a day each... we have to dry 360 apples. Today we put up 20 but at the moment I have no idea how many we've already done. Probably 200. Maybe it will be an apple a day between the two of us!
I've had quite a few dried foods that are rather disgusting. We like to dry bananas as well as apples because bananas taste so good when they're crisp and free of the "normal" commercial processing. I always wondered why dried bananas tasted like funky french fries, reason is bananas are often flash fried then dried and sugared. Blah!
Our method for dried bananas is pretty simple:
Start with ripe bananas... I mean really ripe. In fact, those super ripe discounted bananas you pass by at the grocery store... just keep on walking because we love those for dehydrating and buy every last one in the store which usually runs to 40 bananas at a time. Bananas are best to dehydrate when they are ripe and full of lovely tasting sugar.
Partially peel the banana. I leave about 1/3 the peel on because it helps to hold the slices in place while I slice and makes the transport to the tray super easy.
We like our bananas dried crispy and slicing to 1/8th an inch works best for this.
Place in drier and forget for 24 hours.
A single banana weighs in at around 147 grams (about 5 oz.). This sandwich bag of dried bananas weighs 127 grams and holds about 4 bananas. In the end the weight is reduced by around 1/5th (a banana shrinks to about 1 ounce).
The last time we dried bananas we experimented with a honey/water glaze and then an agave nectar/water glaze. We dipped the bananas in the glaze before drying. Both attempts yielded a very good snack but we didn't notice any difference in the browning or not browning of the bananas. Then again we don't worry too much about how they look.
With our apples it's a little bit more involved and by that I mean one extra step:
We quarter the apple, slice the core out at an angle, then thin slice (again 1/8th an inch if possible).
The apples then soak for a bit in a bath of acid/water. Our favorite is diluted pineapple juice drained from a can of pineapple chunks (we usually eat the pineapple before we get started otherwise I keep eating slices of apple!).
Next the slices are spread on the trays and again... 24 hours later they're ready. The pineapple juice adds a nice bite to the apple but lemon juice and water works just fine too. The acid also helps to keep the apples from browning a great deal before they dry.
Our apples are about 175 grams (just over 6 ounces) each. When dried a little more than 2 fit in a sandwich bag. This bag of 2 apples weighs 45 grams which means they are reduced to 1/12th their original weight (about 3/4 of an ounce)!
The hardest part about drying the fruit is waiting until the hike to eat it. Well... it doesn't all make it to storage. We have to do quality control inspections right?!
We don't expect to be able to dry all the food that we'll need for the trip. There's just not the time or the space in our RV. Here's a shot of the dehydrator trays spread apart to aid cooling before bagging:
The food we dry will be supplemented with various foods. I've looked into both dehydrated and freeze dried. There's always peanut butter too!
Subscribe to:
Posts (Atom)